Deploy via GitHub Actions (Recommended)
Overview
GitHub Actions streamlines the deployment process to multiple Twilio Flex instances through a comprehensive release pipeline. It facilitates enhanced management of environment variables using the Environment feature of GitHub, allowing the use of multiple environments to ensure consistency of deployment across different Twilio Flex instances through utilizing the same code base.
Pre-Requisites
- Twilio Flex Account (Guide)
- GitHub Account (Guide)
- Required values for each respective custom channels (Guide)
Instructions
- Fork this GitHub repository into your own GitHub account
- Set the forked GitHub repository to be a public repository as GitHub Actions is only free for public repositories.
- Navigate to your Twilio Console to create your Twilio API Key and API Secret (Guide).
- You will need to obtain the following before proceeding:
TWILIO_ACCOUNT_SID: Twilio Account SID that you are deploying to (starting withACxxxxxxxxx)TWILIO_API_KEY: Twilio API Key (starting withSKxxxxxxxxx)TWILIO_API_SECRET: Twilio API Secret
- You will need to obtain the following before proceeding:
- For each custom channel that you would like to enable, create 1 TaskRouter - Task Channel per custom channel (Guide).
- For each custom channel that you would like to enable, it is recommended that you create 1 Studio per custom channel (Guide).
- You will need to have the Studio Flow SID (starting with
FWxxxxxxxxx) of each custom channel that you would like to enable. - For channels that you do not want to enable, you do not need to create the Studio Flow.
- You will need to have the Studio Flow SID (starting with
- For each custom channel that you would like to enable, perform the necessary setup and obtain the required values. The required variables per custom channel can be found in the Channels Overview page.
- Within GitHub Console, navigate to the repository that you have forked, click on
Settings > Environment > New Environmentand add the following secrets with the value you have obtained from the previous steps:TWILIO_ACCOUNT_SIDTWILIO_API_KEYTWILIO_API_SECRET- Required variables per custom channel that you want to enable
- Example: To enable only LINE, you would need the following variables with their respective values:
TWILIO_ACCOUNT_SIDTWILIO_API_KEYTWILIO_API_SECRETLINE_STUDIO_FLOW_SIDLINE_CHANNEL_IDLINE_CHANNEL_SECRETLINE_CHANNEL_ACCESS_TOKEN
- Example: To enable both LINE and Viber, you would need the following variables with their respective values:
TWILIO_ACCOUNT_SIDTWILIO_API_KEYTWILIO_API_SECRETLINE_STUDIO_FLOW_SIDLINE_CHANNEL_IDLINE_CHANNEL_SECRETLINE_CHANNEL_ACCESS_TOKENVIBER_STUDIO_FLOW_SIDVIBER_AUTH_TOKEN
- Example: To enable only LINE, you would need the following variables with their respective values:
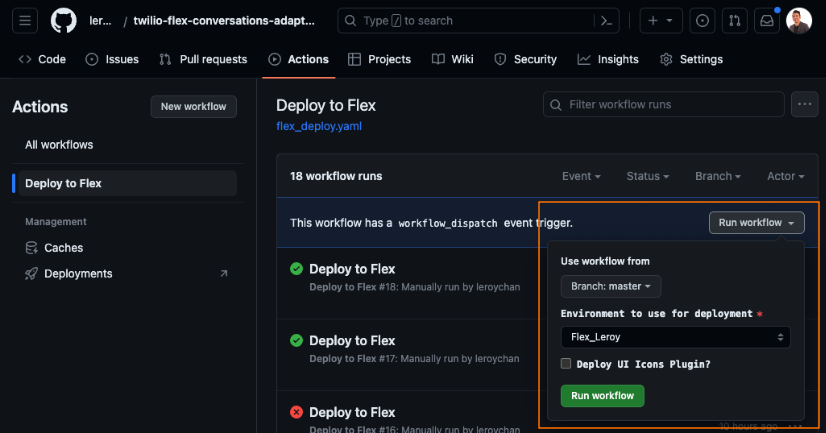
- Within GitHub Console, navigate to the repository that you have forked, click on
Actions > Deploy to Flex > Run workflow. Select the environment that you have created previously and clickRun workflow- If you are deploying for the first time, tick the box that says
Deploy UI Icons Plugin?. You will only need to do this once per Flex Account SID.
- If you are deploying for the first time, tick the box that says
- The workflow will run to build, compile and process all the required components and deploy it to your chosen environment (i.e. Flex Account). You can also click on each of the workflow runs to view the logs.
- Within Twilio Console, on the left hand side menu bar, navigate to
Functions and Assets > Services. Look fortwilio-flex-conversations-adaptersand click onService Details. UnderEnvironments > Domain, take note of the domain URL.- The domain URL should be in the format of
twilio-flex-conversations-adapters-<RANDOMNUMBER>-dev.twil.io.
- The domain URL should be in the format of
- We will need the respective custom channels
incomingwebhook URL that is in the format ofhttps://twilio-flex-conversations-adapters-<RANDOMNUMBER>-dev.twil.io/api/<CHANNEL>/incoming- Example:
LINE:https://twilio-flex-conversations-adapters-<RANDOMNUMBER>-dev.twil.io/api/line/incomingViber:https://twilio-flex-conversations-adapters-<RANDOMNUMBER>-dev.twil.io/api/viber/incoming
- Example:
- Configure each custom channel's webhook setting in their respective consoles with the
incomingwebhook URL in the previous step. Refer to the respective documentation page underChannelsfor exact instructions. - You have now completed the setup. Proceed to test the integration by logging into your Flex Agent console and put yourself as
Available. Send a test message to your custom channnel and it should appear in your Flex Agent console.